Showing posts with label DIY. Show all posts

Sunday 28 June 2015

Using natural dyes

Whilst creating work for my degree piece I began experimenting dying fabrics using natural pigments and products. Years ago I attended a textile workshop where we used rusty objects to dye and stain fabrics which I was surprised to discover produced some beautiful results. Since my latest project focused on the life and work of honeybees, I was keen to use natural dyes to create the fabric used in my textile work since I felt this would work well with the context of my piece. A quick internet search led me to a whole abundance of blogs and tutorials about using natural dyes. From spices such as turmeric to dandelion roots or red cabbage you would be surprised by how many things that you probably already have at home or in your garden that you can use to produce some really effective dyes.

For my honeybee work I was focusing on the symbolism of the colour yellow, so I stuck to using turmeric, onion skins and dried plant extracts from yellow flowers such as weld and madder. If you want to grow plants specifically to use as dyes there is a great website  was able to find a great UK website http://www.wildcolours.co.uk/index.html which sells many different flowers seeds. If you are impatient to get dyeing and see some results, they also sell dyes, flower/plant extracts and mordants. That particular website was a great resource of information for me when it came to getting started with dyeing - they provide some really useful tips and information on which are the best fabrics to use and how to prepare your fabric so that the colours will last. 


Weld - a great flower to use either dried or fresh to create a yellow dye

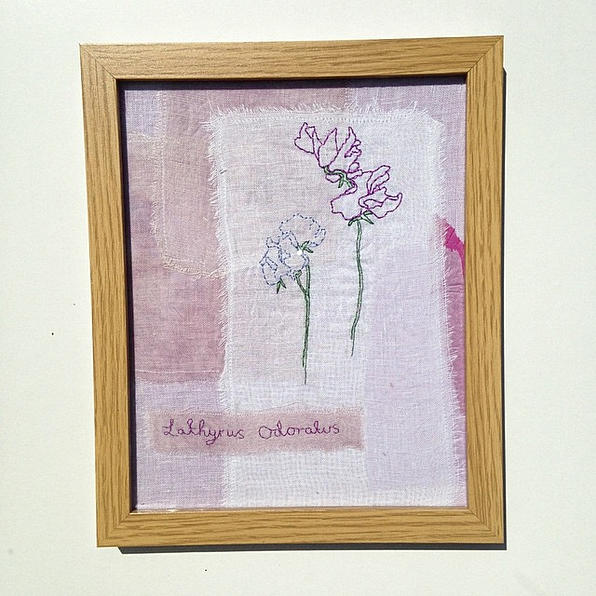
For a recent commission I was asked to create an embroidery of a sweet pea so decided to use this as an opportunity to experiment with some purple dyes. A quick trip to the supermarket provided me with some red onion skins, beetroot, red cabbage and black beans and after soaking my fabric in vinegar to mordant it, I soon began to get to work with the dyeing! Each dye produced a different colour - all of which were lovely but it was the red cabbage which created the nicest shade of purple. I also used a couple of different fabrics - thin muslin cotton, silk and a thicker cotton/calico which also led to a lot of variation in the tones and shades of each dye. Bear in mind that it is always best to use natural fibres when dyeing to produce good results. Below is a picture of my finished piece. All the fabric used was dyed using red beetroot then layered up an embroidered onto.


I really loved the process of natural dyeing - it may sound silly but it is so satisfying to see such great results so quickly just by using products that are so simple to attain! It is definitely a process I am keen to learn more about and continue to experiment with. The possibilities If what you can do are endless... 
Below I have left some links to some of the blogs and tutorials that helped me get going, as I said there are so many out there each of which describe different techniques and methods. I have also included the website of artist India Flint. A innovative  textile artist who has really taken things to the next level with her methods and use of natural dyes.

Enjoy exploring and experimenting!


Folk Fibers blog -  yellow and red onion skin tutorial


Wednesday 18 June 2014

DIY Festival bum bag


It's an exciting thought that this time next week I will be with all my friends at Glastonbury Festival! Hopefully I will be sat on a stone of the Stone Circle - watching the sunset and enjoying the buzz of the crowd. Last year was my first time at Glastonbury and I was so apprehensive before I went, however like most people do I fell in love with it and could happily spend every summer going!


I thought I'd share with you a DIY I made last week in preparation for the festival - an essential accessory for carrying any valuables or vitals that you need close to hand. Bum bag/fanny pack -whatever you want to call them, they are definitely a must have for any festival.


Mine was made using completely recycled materials - the embroidered fabric was from an old dress that I used to love but had a stain on it; the lilac fabric was from a throw that used to cover my sofa!


Ralph my Cat helping me make the bum bag!


You will need:

Pretty fabric or material  (at least 25cm x 10cm)
A zip that measures the same length as your chosen fabric
A belt (this can be a belt you already own or a new one. You could also use some brightly coloured bias binding or some pom pom trim would look great too!)
Extra fabric for belt loops (7cm x 2cm)

Step 1 
Cut two pieces of fabric so that they are the same size and shape. You can make the bum bag as big as you need - the one here measures 15cm x 30cm which is quite a nice size as I can fit my purse, ID, phone and anti bacterial hand gel in it!


Step 2
Pin your zip in between the two lengths of fabric making sure that the front of the zip is on the same side as the front of your fabric


Step 3
Sew on your zip. I used a sewing machine but you could hand sew ; just make sure you use strong thread and perhaps do more than one line of stitching to make sure it is secure.

Step 4
In order to create belt loops, take two strips of fabric and cut them into equal lengths measuring roughly 7cm x 2cm. The length of these can vary depending on how thick your belt is but don't make them too thin as they need to be strong.


Step 5
Pin the belt loops onto each end of one of the rectangles of fabric. Make sure they are at least 1.5cm away from the edge to allow for seam allowance. Once you are happy with the position, stitch across the end of each loop several times so they are firmly attached. It is important that the belt loops are strong enough so if your fabric is quite thin it may be worth doubling it up to create the loops which is what I had to do with mine.


Step 6
Pin together your bum bag around each edge so the front side of each rectangles are facing each other and on the inside. At this point make sure you open the zip so you will be able to turn your bum bag the right way once you have finished!

Step 7
Sew neatly around edges making sure the seams are even. Turn the bag inside out through the open zip. It should now just resemble a finished purse!

Step 8
Thread your belt through the loops and ta da! One complete festival bum bag! The good thing about this design is that you can either change the belt or make more than one bum bag for the same belt so that you can have one to match every pre planned festival outfit!


I did have a photo of me modelling the bum bag but I looked a bit weird so I'll upload a better one of me using it soon!


I hope you enjoyed the DIY - make sure you also check out my DIY festival water bottle holder here

Saturday 23 February 2013

If I was a rich girl...


I would do all of my shopping at Free People. They do the best boho/hippy chic clothes ever but unfortunately their prices are beyond ridiculous and don't quite match the whole ethic and lifestyle that they try to promote. Maybe one day when I have more money than sense I will shop there but until then I'll keep looking in the sale section of the website!

Here are some things I am currently lusting over:


Vintage Tribe Yoga Bag (£425!! - That would pay for yoga classes for the rest of my life!)


Free people also have a really good blog which is good for motivational quotes, outfit inspiration, creative DIY's and music. They also do a weekly horoscope which for me is always scarily accurate. You can follow their blog here.


Tuesday 12 February 2013

A Package Of Love.... DIY


Many people seem to hate Valentines Day and find it depressing - but I reckon it's a good excuse to show all those you care about that you love them instead of just your partner. I put together a little package of love for my Grandparents to give them something to smile about on Thursday. 


The package included a card, lots of patterned paper hearts, some hand made heart hand warmers and instructions of how to use them.


Making the hand warmers is really easy:

1. Pick pretty fabric and cut out two heart shapes, pin right sides together and sew (leaving a small gap)

2. Turn inside out and fill the heart with rice. I also put some dried lavender in mine so they smelt nice too!

3. Sew up the small gap and voilĂ ! All you need to do is pop them in the microwave for 20 seconds or so and then put them inside your gloves to warm up cold hands! 


Tuesday 15 January 2013

Winter Mittens


For Christmas and Birthdays, I like to try and hand make the presents I give whenever possible as to me it feels so much more personal and a good way to show the people I care about how much they mean to me. This Christmas was no exception and any spare time I had from work I spent creating and crafting! Below are some photos of the mittens that I hand made and embroidered for my Mom. 


I used a wool blend for the outside of the mittens and lined it with pink fleecing so they were extra warm and snuggly! The lace was cut from an old vintage scarf.


Maybe next year I shall make a scarf to match!

Monday 3 December 2012

Creepy or cute?

As a cat lover I have had my eye on this book for a while, but I can't decide whether it's creepy or cute! It offers a solution to clothes and furniture covered with cat hair - collect it all up and use it for all sorts of crafts projects such as tote bags, finger puppets and mittens! Shall I put it on my Christmas list or is this just going to officially turn me into a 'crazy cat lady'?!  For anyone who is interested the book is available on Amazon here and I have also seen it in store in Waterstones bookshop.


Thursday 28 June 2012

DIY Festival water bottle carriers

Hello! With all the summer music festivals approaching, I thought I would create a DIY tutorial for an essential festival accessory... 


Carrying a handbag around at festivals is pretty impractical and it can be annoying when you want to dance etc, using a rucksack is one way of keeping your hands free, but for quick access to your drink, this pretty bottle holder should come in useful!

These are really quick to make and can easily be customised to personal taste. I have included a step by step guide below.


You will need:


1. Roughly 12x 12 inches of plain coloured fabric, 12 x 4 inches of patterned fabric. The size can depend on how big a bottle you are intending to carry around. 

2. Three different colours of bias binding or ribbon roughly 48 inches long

3. Brightly coloured thread or cotton.

4. Fabric scissors or pinking shears if you have them.


Step 1


To begin with, fold the plain fabric in half. This will help strengthen the water carrier and gives a neat finish to the top edge and will stop it from fraying.

Cut the patterned fabric (using pinking shears if you have them) so it comes to about the third of the size of the plain fabric and sew it so there is a 1.5 inch of plain fabric showing at the top. I machined stitched it which speeds the whole process up, but it would also be quick to sew by hand. Alternatively you could use bondaweb to adhere the two fabrics together.

I also did a simple running stitch about a cm from the top of the fabric. This isn't essential but if you use a bright coloured thread it does make the carrier look even prettier :)


Step 2


With the right side of the fabric on the inside, fold it in half and stitch down the right hand side leaving an inch seam allowance. At this point you could just check that the sizing so far is right by using a standard empty water bottle - adjusting the seam allowance if needed.


Step 3


In the same way that you would wrap a present, fold up the ends of your carrier, pin them together and sew! Strong thread is needed here - don't worry about it looking too neat as it won't be seen but its important that the ends are secure so you don't lose your drink!


Step 4

Tie your three colours of binding or ribbon together and plait them - ending with another knot. Sew each end   on to the insides of your carrier - again make sure you use strong thread and go back over your stitching several times as you don't want the strap to break.


Step 5


Cut off any lose threads and ta da! Your drinks carrier  is complete!  Enjoy!